【代理】在一台废弃VPS上重新走一遍Xray-core代理配置流程

免责声明: 本文所述内容仅供技术学习和研究使用,不构成任何形式的非法行为指导。请读者严格遵守所在地区的法律法规,自行判断和承担使用相关技术可能带来的风险。作者不对因使用本文内容而产生的任何法律责任承担责任。

前言

这是一台即将到期的RackNerd的VPS,我已不打算续费。在它生命即将走到尽头之际,我打算用它重新配置一遍Xray-core,并作此记录,以留后用。

系统选择

仅用作代理的VPS,系统求稳定即可。所以我选择安装了Debian 10 64 Bit

Debian 10 64 Bit

换源与更新系统

执行apt update时会遇到错误,这是因为Debian 10(Buster)已经停止官方支持,APT 源被移到 archive.debian.org,所以用原来的地址会 404。要解决这个问题,需要手动改APT源到归档源,然后才能继续更新和安装。

  1. 修改 APT 源 先备份原来的源:

    1
    
    cp /etc/apt/sources.list /etc/apt/sources.list.bak
    

    然后编辑:

    1
    
    nano /etc/apt/sources.list
    

    替换成下面的内容(适用于 Debian 10 Buster):

    1
    2
    3
    4
    5
    6
    7
    8
    
    deb http://archive.debian.org/debian buster main contrib non-free
    deb-src http://archive.debian.org/debian buster main contrib non-free
    
    deb http://archive.debian.org/debian-security buster/updates main contrib non-free
    deb-src http://archive.debian.org/debian-security buster/updates main contrib non-free
    
    deb http://archive.debian.org/debian buster-updates main contrib non-free
    deb-src http://archive.debian.org/debian buster-updates main contrib non-free
    
  2. 允许使用过期的源

    1
    
    echo 'Acquire::Check-Valid-Until "false";' > /etc/apt/apt.conf.d/99ignore-release-date
    
  3. 更新系统

    1
    
    apt update && apt upgrade -y
    

    这样就能正常安装后续需要的工具了。

本部分由ChatGPT生成,经本人验证,可以解决问题。

配置VPS

这里参考之前写过的文章【Proxy】How to Build Proxy with XRay,此处不再赘述。

安装Xray-core

Xray官方提供了一键安装脚本

执行以下命令安装Xray-core

1
sudo bash -c "$(curl -L https://github.com/XTLS/Xray-install/raw/main/install-release.sh)" @ install
  1. 脚本依赖curl。若提示bash: curl: command not found,则执行以下命令安装curl:
    1
    
    sudo apt install curl
    
  2. 脚本需要以root身份执行,所以前边要加sudo

安装完成后,运行xray version,返回如下图所示的版本信息,代表安装成功。

xray version

配置Xray-core

以下以VLESS-TCP-XTLS-Vision-REALITY为例。Xray官方也给出了各种配置示例,详情可以参考GitHub Xray-examples

生成uuid

生成一个uuid备用。

1
xray uuid

uuid

本文使用以上图生成的6b22b0d8-4bcb-4c95-b8d8-1a3488d0f460

uuid相当于一个令牌(Token),不要轻易示人,客户端需要配置此id才可使用此梯子。

生成x25519公私钥

1
xray x25519

x25519

本文使用上图生成的公私钥:

  • Private key: YPus0-HqMBiQpiJ02hpnmJSodGRIhxG-tGlRjKoAV18
  • Public key: CLQaGhx37ZpcLbNhl5JXRay-5hJwbg7wYQtIDS5R9mc

私钥会写在Xray服务端的配置文件中,而公钥是需要使用此梯子的客户端需要配置的内容。

生成shortIds

shortIds是一个客户端可用的shortId列表,服务端可用此来区分不同的客户端。自己造就好了。规则如下:

  1. 范围是0f;
  2. 长度是2的倍数;
  3. 最大长度为16。

本文使用7df26a3cb5

客户端需要填上shortIds中的其中之一才可使用该梯子。

修改Xray配置文件

执行以下命令修改Xray配置文件:

1
sudo nano /usr/local/etc/xray/config.json

根据VPS的IP地址以及前述步骤生成的各种id、密钥等,本文使用以下配置文件(未使用warp解锁chatGPT客户端):

 1
 2
 3
 4
 5
 6
 7
 8
 9
10
11
12
13
14
15
16
17
18
19
20
21
22
23
24
25
26
27
28
29
30
31
32
33
34
35
36
37
38
39
40
41
42
43
44
45
46
47
48
49
50
51
52
53
{
    "log": {
        "loglevel": "debug"
    },
    "inbounds": [
        {
            "port": 443,
            "protocol": "vless",
            "settings": {
                "clients": [
                    {
                        "id": "6b22b0d8-4bcb-4c95-b8d8-1a3488d0f460", // run `xray uuid` to generate
                        "flow": "xtls-rprx-vision"
                    }
                ],
                "decryption": "none"
            },
            "streamSettings": {
                "network": "tcp",
                "security": "reality",
                "realitySettings": {
                    "dest": "lapl.org:443", // A website that support TLS1.3 and h2. You can also use `1.1.1.1:443` as dest
                    "serverNames": [
                        "lapl.org"        // A server name in the cert of dest site. If you use `1.1.1.1:443` as dest, then you can leave `serverNames` empty, it is a possible ways to bypass Iran's internet speed restrictions.
                    ],
                    "privateKey": "YPus0-HqMBiQpiJ02hpnmJSodGRIhxG-tGlRjKoAV18", // run `xray x25519` to generate. Public and private keys need to be corresponding.
                    "shortIds": [ // Required, list of shortIds available to clients, can be used to distinguish different clients
                        "7df26a3cb5" // If this item exists, client shortId can be empty. 0 to f, length is a multiple of 2, maximum length is 16
                    ]
                }
            },
            "sniffing": {
                "enabled": true,
                "destOverride": [
                    "http",
                    "tls",
                    "quic"
                ],
                "routeOnly": true
            }
        }
    ],
    "outbounds": [
        {
            "tag": "direct",
            "protocol": "freedom"  // Main Outgoing Protocol
        },
        {
            "tag": "block",
            "protocol": "blackhole"
        }
    ]
}

针对VLESS-TCP-XTLS-Vision-REALITY方案,以上配置文件需要注意以下内容:

  1. id:之前通过xray uuid生成的内容;
  2. dest:填一个地址,这就是所谓“reality偷域名”中偷的那个域名,后边加上443端口。上述以洛杉矶图书馆的域名(lapl.org)为例子,填lapl.org:443
  3. serverNames:填“偷”的域名,如lapl.org
  4. privateKey:之前通过xray x25519生成的私钥PrivateKey);
  5. shortIds:之前编的shortIds,如7df26a3cb5;
  6. IP地址:IPv4地址填VPS的公网IPv4地址,IPv6地址填Warp虚拟出的IPv6地址。
  1. 关于偷域名有一些讲究,最好是偷自己,其次是偷与VPS IP地址同段的网址或者VPS附近的大学、图书馆、政府网站等等。对被偷域名的要求是支持TLS1.3和H2。详情参考Xray官方解释REALITY作者在GitHub的回复
  2. warp解锁ChatGPT客户端参考Warp解锁ChatGPT客户端

运行Xray-core

以下为Xray-core进程常用管理命令。

1
2
3
4
5
6
7
8
# Start Xray
sudo systemctl start xray
# Restart Xray
sudo systemctl restart xray
# Set XRay to start at boot
sudo systemctl enable xray
# Check Xray status
sudo systemctl status xray

客户端配置

Android

安卓端目前比较好用的客户端是V2RayNG

以上述服务端配置为例,在V2RayNG中添加一个VLESS配置,内容如下图:

V2RayNG

需要注意:

  1. remarks:给该梯子起个名字;
  2. address:梯子的IPv4地址;
  3. port:Reality使用443端口;
  4. id:即服务端的id
  5. flow:与服务端一致,xtls-rprx-vision
  6. encryption:none;
  7. network:tcp;
  8. TLS:选reality;
  9. SNI:即偷的域名;
  10. PublicKey:即服务端xray x25519生成的公私钥中的公钥PublicKey)。
  11. ShortId:即服务端ShortIds中的一个。

Windows

Windows目前比较好用的客户端为V2RayN。与安卓端的V2RayNG同作者。

其实V2RayN是一个跨平台GUI客户端,支持Windows、Linux、macOS。

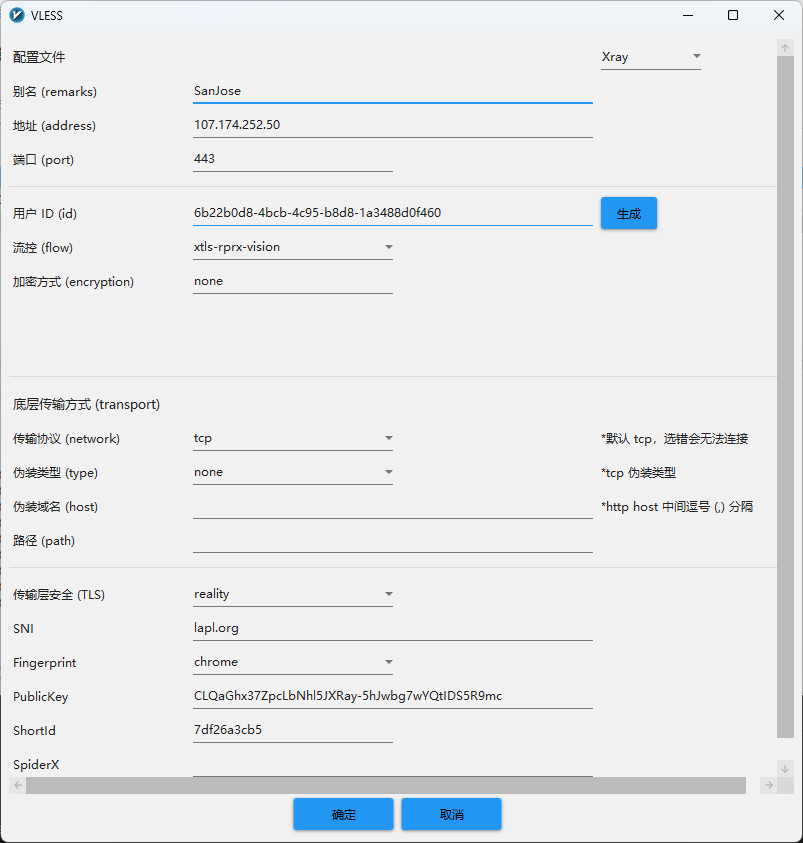
以上述服务端配置为例,在V2RayN中添加一个VLESS配置,内容如下图:

V2RayN

需要注意的内容同安卓端一样。

  1. 别名:给该梯子起个名字;
  2. 地址:梯子的IPv4地址;
  3. 端口:Reality使用443端口;
  4. 用户ID:即服务端的id
  5. 流控:与服务端一致,xtls-rprx-vision
  6. 加密方式:none;
  7. 传输协议:tcp;
  8. 传输层安全:选reality;
  9. SNI:即偷的域名;
  10. PublicKey:即服务端xray x25519生成的公私钥中的公钥PublicKey)。
  11. ShortId:即服务端ShortIds中的一个。

macOS

macOS端目前本人没有使用GUI客户端,而是直接命令行跑的Xray-core,详情可参考You Don’t Need a GUI Proxy Client

Reference

  1. 【Proxy】How to Build Proxy with XRay
  2. Xray官方GitHub
  3. Xray官方安装教程
  4. Xray官方配置示例
  5. Xray官方解释
  6. REALITY作者在GitHub的回复
  7. V2RayNG官方GitHub
  8. V2RayN官方GitHub
  9. You Don’t Need a GUI Proxy Client
Licensed under CC BY-NC-SA 4.0